Mary Tayin1971

Skype for Business Download Mac 10.10 UPDATED

Skype for Business Download Mac 10.10

Skype for Business Download Mac 10.10 UPDATED

Pdf Printer for Mac Free Download UPDATED Free

Pdf Printer for Mac Free Download

Leader badge

PDFwriter is a printer driver for Mac Os X, which will let you generate PDF files by simply press.

PDFwriter is heavily based on CUPS-PDF. It doesn't use ghostscript to generate PDF files, instead information technology uses the Mac Os X internal pdf capabilities.

Other Useful Business Software

Digital Commerce Solutions with MarketStudio Icon

MarketStudio is a spider web-based offering for small & medium and large product enterprises, which customers can employ to scan, manage, and publish rich content to Print, Spider web, and Dealer portals from anywhere/anytime.

User Ratings

★★★★★

★★★★

★★★

★★

ease i of five 2 of 5 3 of five 4 of v 5 of five 3 / 5

features i of v 2 of five iii of five 4 of five 5 of five 3 / 5

pattern 1 of 5 2 of v 3 of 5 four of 5 5 of v 3 / 5

support 1 of 5 ii of five three of v 4 of 5 5 of 5 2 / 5

User Reviews

  • This has not been updated since 2011 and does not seem to show upwardly properly on recent versions of macOS. I know there is a workaround, but this should not be necessary. Therefore I tried the fork from rodyager on Github which is based on this project. It installs properly on macOS Catalina. Thus I would recommend using RWTS-PDFwriter which automatically adds the printer without requiring user configuration. Google: github rodyager RWTS-PDFwriter

  • I used MikePro2 's advice and it worked. I have a workaround for PDFwriter printing to folder you lot don't like. I use the Hazel app. It is quite easy to accept Hazel monitor the binder, move all new files to a binder of your choosing and rename them according to your method and you lot don't have to exercise annihilation once information technology is set. You lot can even have information technology tagged and yous tin can monitor according to contents, my water bill gets tagged due and gets filed in the water nib folder. I actually take adobe acrobat, but I use PDFwriter for persnickety files that won't print the way I want.

  • I replace my user folder in /private/var/spool/pdfwriter (this is where the binder in /Users/Shared points) with a symbolic link to my Desktop folder so that jobs are printed directly to my desktop instead found in the Shared folder. This broke subsequently upgrading to El Capitan with a sandboxd error that prevented the impress driver from accessing my Desktop Folder. The solution is to add "Sandboxing Relaxed" to /etc/cups/cups-files.conf as detailed at tempel'due south blog entry "making-cups-printer-drivers-piece of work-again.html" (URLs prohibited).

  • Found out I tin't select the folder to create the PDF, then I followed the problems for the PPD file, then I did a print sample: 5 pages out of 29 in a 5.1MB file... created a 126MB file. This has been uninstalled.

  • Once you find your pdfs below /Users/Shared/PDFwriter yous recognize that all files have a length of goose egg bytes. Then you dig through reviews to accidently find the information on how to specify the provided PPD file in club to brand the software fly. Finally working, just horrible UX. (Tested on El Capitan.)

Read more reviews >

Additional Projection Details

Registered

2010-09-29

Pdf Printer for Mac Free Download UPDATED Free

Posted by: marytayin1971.blogspot.com

How to Install a Pen+gear Dry Erase UPDATED

How to Install a Pen+gear Dry Erase

Installing Your Infinity Glass Whiteboard

We know you're excited to start using your Quartet Infinity Glass Dry-Erase Board! To help y'all get started, we've provided detailed instructions for mounting your glass whiteboard. Delight note that instructions may vary depending on the size of your board, but all Infinity boards will follow the same basic steps.

Refer to the chart beneath to make up one's mind how many mounting holes your board has and adjust the steps accordingly.

Size Infinity SKUs Mounting Holes
24" x 18" G2418B, G2418W, G2418F, GC2418F, G2418NMW four
36" x 24" G3624B, G3624W, G3624F, GC3624F, G3624NMW four
48" x 36" G4836B, G4836W, G4836F, GC4836F, G4836NMW iv
72" x 48" G7248B, G7248W, G7248F, GC7248F, G7248NMW 6
96" ten 48" G9648B, G9648W, G9648F, GC9648F, G9648NMW 8

What's Included in the Hardware Kit?

  • A) Infinity Glass Whiteboard
  • B) Accessories Tray
  • C) Metal Threaded Standoff Caps
  • D) Washers (2 Washers per Hole)
  • Eastward) Phillips Head Screws
  • F) Self-Drilling Drywall Anchors
  • G) Metallic Threaded Standoffs

What Else Do I Need?

  • Pencil
  • Level
  • Phillips Head Screwdriver
  • Power Drill

Infinity Installation Parts

Step 1– Set for Installation

  • Brand sure yous take plenty people to install your board. We recommend two people for smaller boards and iii+ people for 72" x 48" and 96" x 48" boards.
  • Place the Glass Whiteboard (Role A) against the wall in the desired installation location.
  • Identify a level on acme of the board to ostend it is level.
  • Utilize a pencil to marker an "x" in each mounting hole.
  • Pro Tip - Only apply a pencil when marking the holes. Read our helpful whiteboard installation tips to find out why.

Infinity Installation 1

Step 2-5 – Insert Wall Anchors

  • Advisedly remove the glass whiteboard from the wall and place it in a safe spot.
  • Use a 7/32" drill bit to create the pilot hole.
  • Insert a Self-Drilling Drywall Ballast (Part F) into each of the "x" marks using a Phillips Head screwdriver. Plough clockwise until the head of each anchor is affluent with the wall.

Infinity Installation 2

Stride vi-7 – Install Standoffs

  • Place a Collision (Part G) over each drywall ballast. Insert a Phillips Head Spiral (Part Due east) through the standoff, into the anchor and tighten.
  • The spiral should concord the standoff tightly against the wall, echo this process for all standoffs.
  • Make sure all standoffs are flush against the wall before proceeding.

Infinity Installation 3

Footstep 8 – Install Glass Board

  • Place Washers (Part D) on the threaded section of each metallic Standoff Cap (Function C). Lift glass whiteboard and align holes with the Standoffs (Office G) on your wall.
  • For glass whiteboards 48" ten 36" and smaller: Place a washer behind the drinking glass lath before screwing the metal standoff cap into the barrel.
  • Once all washers are in place: Insert Standoff Caps (Part C) through the whiteboard and into the Barrels (Function 1000).
  • Turn caps clockwise until they are virtually tight against the glass dry erase board. Repeat steps for all standoffs.
  • Fully tighten Standoff Caps once they are all in identify.
    Make sure the standoffs are flush against the board surface.

Infinity Installation 4

Step 9 – Attach Accessory Tray

  • Starting at an angle, press the Accessories Tray (Office B) up along the bottom of the glass whiteboard.
  • The drinking glass should fit between the gap in the back channel of the tray.
  • Button the tray upward until the bottom of the back channel is fully confronting the glass.

Infinity Installation 5

Infinity Glass Whiteboard Mounted on Wall in Office

Ready to Write!

You lot're now ready to beginning using your glass marker lath! Keep your thoughts organized and ideas flowing on the beautifully designed, frameless drinking glass surface. Our Infinity boards are easy to erase, while our dry out-erase markers help y'all create assuming writing. If you take a magnetic glass board, hang upward reference documents and reminders for like shooting fish in a barrel viewing. Personalize the way you use your glass whiteboard to spark your creativity!

Take More Questions?

If you take further questions, please feel free to contact united states of america. You can also download a copy of your manual and visit our Quartet Infinity Glass Dry-Erase Boards folio for more than information on the Infinity line.

DOWNLOAD HERE

How to Install a Pen+gear Dry Erase UPDATED

Posted by: marytayin1971.blogspot.com

Do I Have the Vehicle in Gear to Set the Timing UPDATED

Do I Have the Vehicle in Gear to Set the Timing

Download Article

Download Article

The car's timing refers to the ignition and the process past which the spark plugs fire, creating a spark in the car's combustion bedroom. Your timing must be at the correct setting for your automobile to perform at top level, affecting the speed and efficiency at which the engine fires. Y'all can suit your car's timing with a timing light and a set of wrenches, tools available at whatsoever motorcar parts store.

  1. ane

    Learn if your auto needs to be adapted or non. Modern cars that are controlled by electronic ignitions don't need to have their timing adjusted, just quondam-style iv-stroke engines require that the timing be adjusted periodically to optimize the efficiency of the engine, making sure that the spark fires at the appropriate moment in the ignition cycle.[i]

    • If you hear telltale signs of the timing of your machine non being quite correct, such equally pinging, backfiring, or if the car runs too rich or too lean, you will need to either have it to a mechanic or suit the timing yourself.
  2. 2

    Understand the ignition cycle. The four "strokes" in the 4-cycle engine refer to the procedure of intake, pinch, power, and exhaust. The timing of the ignition refers to the point between the compression and the power strokes at which the spark plug fires, creating the combustion that results in your horsepower, forcing the piston downward into the cylinder.[two]

    • When the piston comes up during the compression stroke, just before the piston gets to the pinnacle of its compression stroke (which is called "meridian expressionless eye"), the spark plug should burn. Over time, this tends to get misaligned somewhat, resulting in a less-than-optimum spark plug firing time. The distance earlier the "tiptop dead" eye is the ignition timing, and it's represented past a row of graded numbers on the balancer or flywheel through an admission hole.[3]

    Advert

  3. 3

    Learn the ignition timing number. Look for the ruler-fashion row of numbers on the front of the engine's harmonic balancer (or flywheel), which should have numbers in a higher place and beneath zero. Typically, when your car comes from the manufacturer, ignition base idle timing is set to a industry specification before top dead center. The timing advances as the engine's speed accelerates, however, resulting in a variable that volition need to be periodically adjusted using a timing light.

    • Numbers to the left of zero on the timing tape refer to the piston as it travels down, while numbers to the right of naught refer to the piston's upward motion. Moving the wheel right is chosen "advancing" the timing, while moving the cycle left is "moving back" the timing.

    Advertisement

  1. 1

    Hook up your timing light or timing gun. Claw your timing gun up to the power and basis terminals on your car's battery, and hook the sensor that accompanies the timing gun to your number one cylinder spark plug wire. Follow the instructions detail to the timing light yous're using to hook it up properly.

    • The "gun" works by illuminating the timing marks in a strobe fashion as it spins, allowing y'all to see the indicate at which the spark plug is firing on the timing index. When the spark plug fires, the sensor sends a signal to the light, which strobes in the gun, illuminating the numbers at the proper moment.
  2. two

    Accept a helper rev the engine. To bank check your timing number and see how it is firing, have someone rev the engine while you illuminate the timing numbers with your low-cal. You obviously want to make sure the automobile is in neutral, and proceed your hands a safe distance from the engine as it revs.[4]

  3. 3

    Smooth the light directly onto the harmonic balancer and notice the number. Though the wheel is turning, the light should seem to "freeze" it at a detail number. This is the timing number. Note the number of degrees to the correct or left of zip.

    • Equally the RPMs increase, the bespeak at which the spark plug is firing should also increase somewhat. This is normal, because ignition works on a curve, allowing for the speed increase and adjusting the timing accordingly.
    • To bank check for full timing, you lot want to be sure to rev the engine to at least 3500 RPMs. This will allow y'all to brand sure the curve of the ignition timing is being set, as well equally the initial timing.
  4. 4

    Account for vacuum timing, if necessary. If your auto features vacuum timing advance in addition to mechanical timing, and you'll need to loosen the benefactor adjustment bolt before you start the engine. Adjacent, remove the vacuum advance hose from the carburetor and plug it with a rag to check your timing.[v]

    • Vacuum timing works past making small adjustments at at low RPM by rotating slightly to adjust for the timing.
  5. 5

    Adjust the timing, if necessary. Now that you've found your ignition timing number, how do you know if you demand to conform it? All models of cars will have differing timing values, depending on the twelvemonth it was manufactured and the diverseness of transmission used. To larn whether or not y'all need to adjust your timing, detect the optimum timing number for your make and model and adjust if necessary.

    • If y'all don't know your timing number, talk to a licensed mechanic or employee at your local auto parts store to consult their manuals and find the proper timing number.

    Advertizing

  1. 1

    Loosen the bolt that secures the engine's distributor enough so that the benefactor can be turned. To arrange your timing, all you need to do is plow the distributor housing one direction or the other, depending on whether or not yous desire to advance or motility dorsum the timing.[6]

    • If the rotor turns clockwise, yous'll advance the timing by rotating the distributor counterclockwise, and vice versa. It'll accept some impact to become it right, then it helps to have someone to rev the engine, check the number, and twist the distributor.
  2. 2

    Adjust while the engine is at idle speed. Grab the distributor firmly and rotate it slowly to i side or the other. Continue rotating until the timing mark is in the right position. Marshal the timing marks past standing to move the distributor and checking with your timing lite. When you've got it gear up where you want it, lock it dorsum down past tightening the benefactor bolts.[7] Reconnect vacuum hoses.

  3. 3

    When in doubt, full timing should be somewhere between 34 and 36 degrees. A typical small-block Chevy'southward timing curve needs to exist set somewhere in this range for maximum performance, when the engine is existence revved at 3500 RPM. At this point, the timing should terminate advancing and should remain steady.[8]

    • Full timing minus your base timing number should meet your engine specification for full accelerate degrees. If the number is not as specified then you lot may take a distributor mechanical advance trouble.
  4. 4

    Tighten the distributor commodities when you are satisfied the timing is set correctly.

    Advertisement

Ask a Question

200 characters left

Include your email accost to get a message when this question is answered.

Submit

Advertisement

Video

  • Clean the timing mark index on the harmonic balancer and mark the elevation dead center mark with a white or yellow paint marker to make information technology easier to view.

  • Information technology is always a good idea to make clean your car's parts after y'all remove them and cheque for wear before reinstalling them.

  • Remember that you are working under the hood of your car with the engine both off and on. Exist sure to have the necessary safety precautions such as wearing close-toed shoes and gloves and not wearing loose clothing that could get caught in a moving part nether the hood of your motorcar.

Advertisement

  • The distributor is handling high ignition voltage. A damaged benefactor or worn spark plug wires tin can deliver a painful daze when handling it with the engine running.

  • Be sure to allow your car's engine to cool before commencement any piece of work on removing parts that might exist hot.

Advertisement

Things You'll Need

  • Owner's manual for your vehicle
  • Set of socket wrenches
  • Timing light
  • Safety glasses
  • Gloves, close-toed shoes
  • Lubricant or degreaser (optional)
  • Paper towels or shop rags

About This Article

Article Summary X

To conform timing, start past finding the optimum timing number for the make and model of your vehicle, which you tin notice online or by request someone at your local auto parts shop. Then, use a timing light or timing gun to check your vehicle's current timing number to meet whether or not it needs to be adjusted. If it does, loosen the bolt that secures your engine'south distributor then you're able to rotate it. One time that'due south loose, just rotate the distributor until the timing marker is in the right position and and so re-tighten the bolt. To learn how to use a timing light or timing gun, scroll down!

Did this summary help you lot?

Thank you to all authors for creating a page that has been read 799,118 times.

Did this commodity help y'all?

DOWNLOAD HERE

Do I Have the Vehicle in Gear to Set the Timing UPDATED

Posted by: marytayin1971.blogspot.com

How to Draw a Chair and Table TUTORIAL

How To Easily Describe Your Kickoff Cyclohexane Chair Using the "Parallelogram Technique"

Now that we've had an aerial tour of the cyclohexane chair, nosotros're going to movement on to a very important skill:how to properly draw 1 of these beasties.

There are several techniques for properly draw a cyclohexane chair.

In this video, I walk through what I consider to be the most completely idiot-proof way to draw a chair, by first drawing a parallelogram (something you should already know how to do). Using this as the "base" of our chair, nosotros then describe flaps moving up and down (representing the caput and footrest), then put in the axial and equatorial groups.

Importantly, we tin use this method to describe a chair in either the "left mitt" or the "right mitt" version of a cyclohexane chair, which becomes important, one time we learn about chair flips (that'south next!)

In time and with a little bit of practice, you won't need to draw the parallelogram to guide you. Think of it as a set of training wheels that you will afterward discard once you don't demand them anymore.

How NOT To Draw The Cyclohexane Chair Conformation: 4 Examples

Having an easy-to-think technique is crucial.

Otherwise, your kickoff few attempts in drawing a cyclohexane chair from retentivity might see you stop up with one of these "variations" from a rogue'due south gallery of four ways to spiral up drawing a cyclohexane chair (and don't feel bad – we've all done it . The trick is to make all the necessary mistakesbefore y'all take your midterm).

Bad Cyclohexane Chair #1: Crow'due south Pes

crows foot cyclohexane how not dto draw a chair bond angles are not tetrahedral 
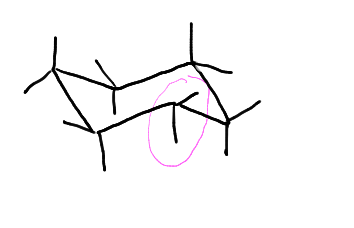
What'due south incorrect? The axial and equatorial positions on the circled carbon are fatigued in the incorrect direction, leading to the carbon having a "crow's foot" appearance. Bond angles in this carbon is not properly tetrahedral – furthermore, the next carbons are eclipsed, non staggered!

How to fix:Flip the groups on the carbon. The "axial down" group should exist drawn as "centric up" and the "equatorial up" group should be drawn equally "equatorial downwards". Think, the axial groups alternate "upward, down, up, down, upward downwards" throughout the ring.

Bad Cyclkohexane  Chair #2: Crow's Foot (slight return)

how not to draw a cyclohexane crows foot switched axial and equatorial 
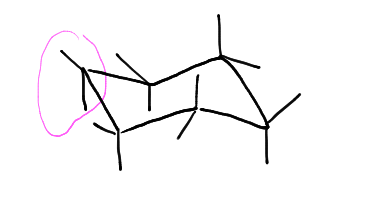
What's wrong?Some other crow'due south foot, although drawn on the "caput rest" of the chair.

How to set up:switch "axial downward" to "axial upward" and "equatorial upward" to "equatorial downward". And then y'all'll come across that your axial groups now alternating up downwards up downward upwards downwards again (similar they should)

Bad Cyclohexane Chair #3: "The Lightning Bolt" [h/t Chemjobber]

how not to draw a cyclohexane chair lightning bolt too thin 
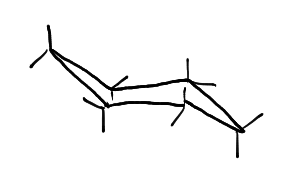
What'south wrong?The axial and equatorial positions are drawn in properly, but the chair is fatigued and then thinly that the forepart carbons obscure the groups on the dorsum carbons.

How to fix: The angles at the "headrest" and "footrest" are too acute; open up them up a bit. Also, stagger the two front carbons and the 2 back carbons so that they're not straight in front of each other.

Bad Cyclohexane Chair #iv: "Mr. Fatty"

how not to draw a cyclohexane chair mister fatty improper dimensions 
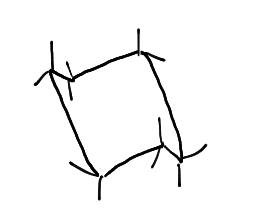
What's wrong?Though all the centric and equatorial positions are drawn properly, this diagram strains the imagination for a cyclohexane supposedly consisting of six equal sides.

How to fix:Pretty straightforward – only don't draw the vertical bonds so long!

DOWNLOAD HERE

How to Draw a Chair and Table TUTORIAL

Posted by: marytayin1971.blogspot.com